What can you make for Valentine’s Day? First idea would be something sweet and red. And heart-shaped, of course. And I thought: what if you braid a heart?
Co można zrobić na Walentynki? Pierwszy pomysł to coś słodkiego i czerwonego. I w kształcie serca, oczywiście. A ja sobie pomyślałem: a gdyby tak zapleść serce?
At my daughter’s school there is a school’s friends association (parents), which raises money to offer the kids a couple extra experiences, such as going to a theatre. One of the events is a Valentine’s Day cake sale.
Well, I’m not a particular cake baker, but I’ll tell you a secret: they don’t verify what you bring, and bread works as well! Last year I made a heart shaped bread:
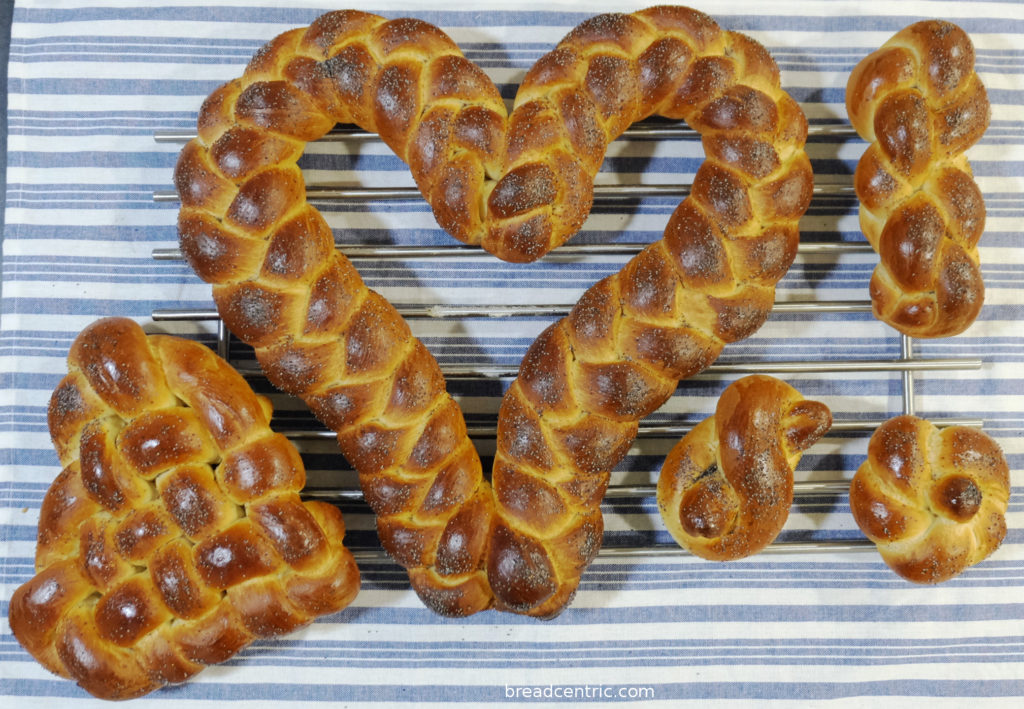
This year I decided to make smaller loaves (I’ll write about them later) and something extra. I’ve made challahs before and I love them for the challenge. The first ones were mainly very uneven, and I wanted to improve on that a little. Also, I got this heart-shaped braiding idea and wanted to try. It’s not perfect, but good to start with.
The recipe comes from J. Hamelman’s “Bread” (sources), as do the braiding ideas. There is also a book on braiding that I don’t have, but the author does magic: “The art of braiding bread” by Roberto van Krammer . If I ever get more into braiding, I’ll buy it.
I’ll describe the heart braiding at the bottom.
Planning
You’ll need a lot of surface for braiding. The dough is ready in a couple minutes, then needs to rise for 2.5 hours. Then you need to divide it in portions, make strings and braid. Since the dough is very firm and elastic, it takes time to make proper even strings out of it, so I do it in phases so that it doesn’t tear. Then 2-2.5 hours rising and about 30 minutes baking.
Ingredients
- 607 g strong white wheat flour
- 300 g high gluten flour (I use bread flour and add approximately 6 g of vital wheat gluten per 100 g of flour)
- 74 g sugar
- 68 g egg yolks (it was 3 large egg yolks in my case)
- 128 g eggs (two large eggs in my case)
- 68 g vegetable oil
- 289 g water
- 17 g salt
- 9 g instant yeast or approximately 27 g fresh yeast
- Some poppy seeds and an egg for the finish before baking
Preparation
- Mix all ingredients together on a lower mixer speed for about 2 minutes, then knead on a higher speed for about 6 minutes. This is a firm dough and a lot of kneading is expected, I do recommend a mixer (or challenging a gym bloke if you’ve got one at home). Oh, one thing – this dough is expected to be quite warm – about 27 C degrees. I used water having about 40 C degrees of temperature when the rest of ingredients were room temperature, around 20 C. If your final dough is colder, you’ll need more time.
- Leave the dough for a bulk proof for about 2.5 hours.
The recipe did not mention degassing or folding the dough, but I did degas after an hour to avoid huge gas bubbles - Divide the dough in portions. I made most into 85 g portions and rounded them slightly. I also made about six 145 g each. They were quite difficult to shape later on
- You’ll need to roll the dough into long strips. Use your palms of hands, start inside and roll out. If you feel the dough resists, put it aside, work with a different chunk and get back to it later. If you feel gas bubbles in the strip, I recommend you puncture them, as they may make your strips uneven. Oh, the strips need to be of even width. The 85 gram ones were about 35 cm in width
- When braiding, remember to make it repeatable and not too tight – the strips need some space to grow
- Leave the braided loaves to proof for 2-2.5 hours. I left them on the baking trays. Don’t pack them too tightly, as they will expand. Some of mines almost doubled
- Set your oven to 190 C without a fan (upper and lower heating elements), or around 170 with a fan. I don’t recommend using the fan
- When the dough rises, brush it precisely with a whisked egg, sprinkle poppy seeds on tom and put it in the oven. You’ll need to observe and shuffle the bread a little in the oven. I usually place my loaves in the lower part of the oven so that the top crust doesn’t form too quickly
- 30 minutes are suggested in the recipe, but I found mines getting too dark after 30 minutes. I simply watched them and took them out when they were brown, but not too dark
Braiding the heart
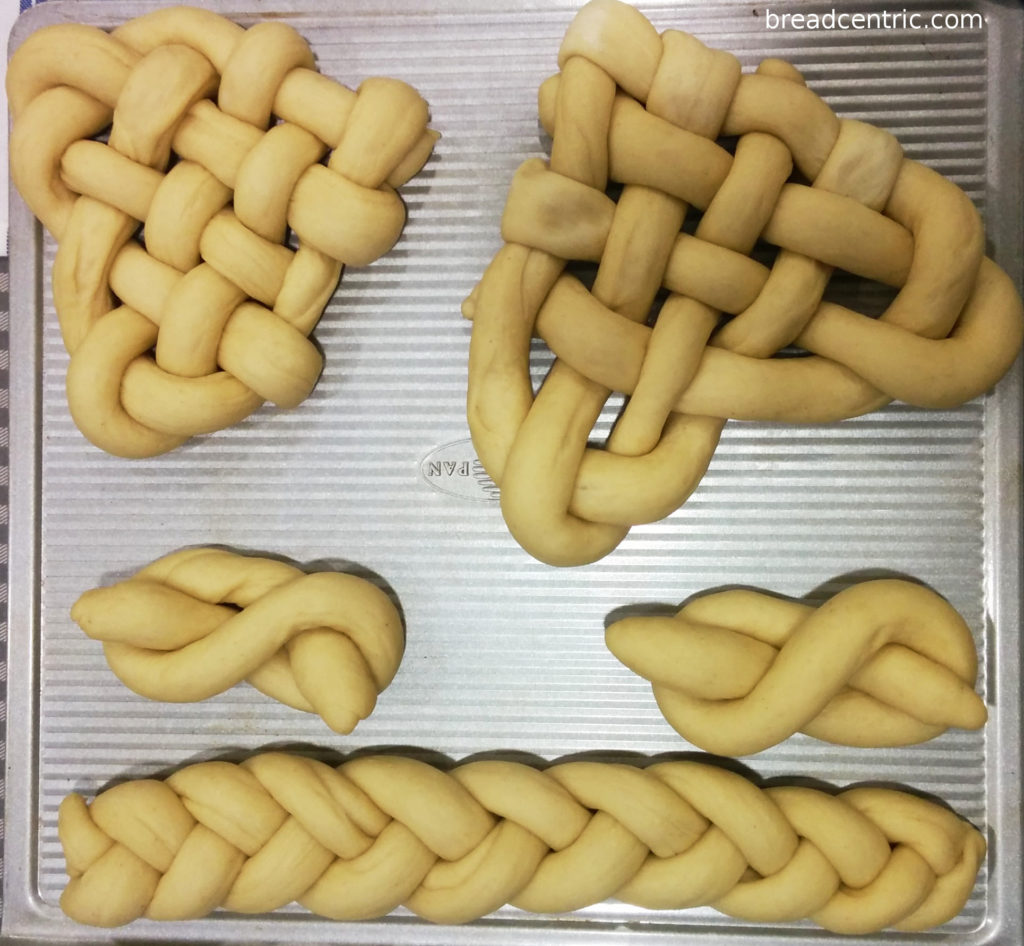
It turned out to be more of a triangle than a heart, but it was the first time I made it. I have an idea for an improvement, but haven’t tried it. I’ll describe it below.
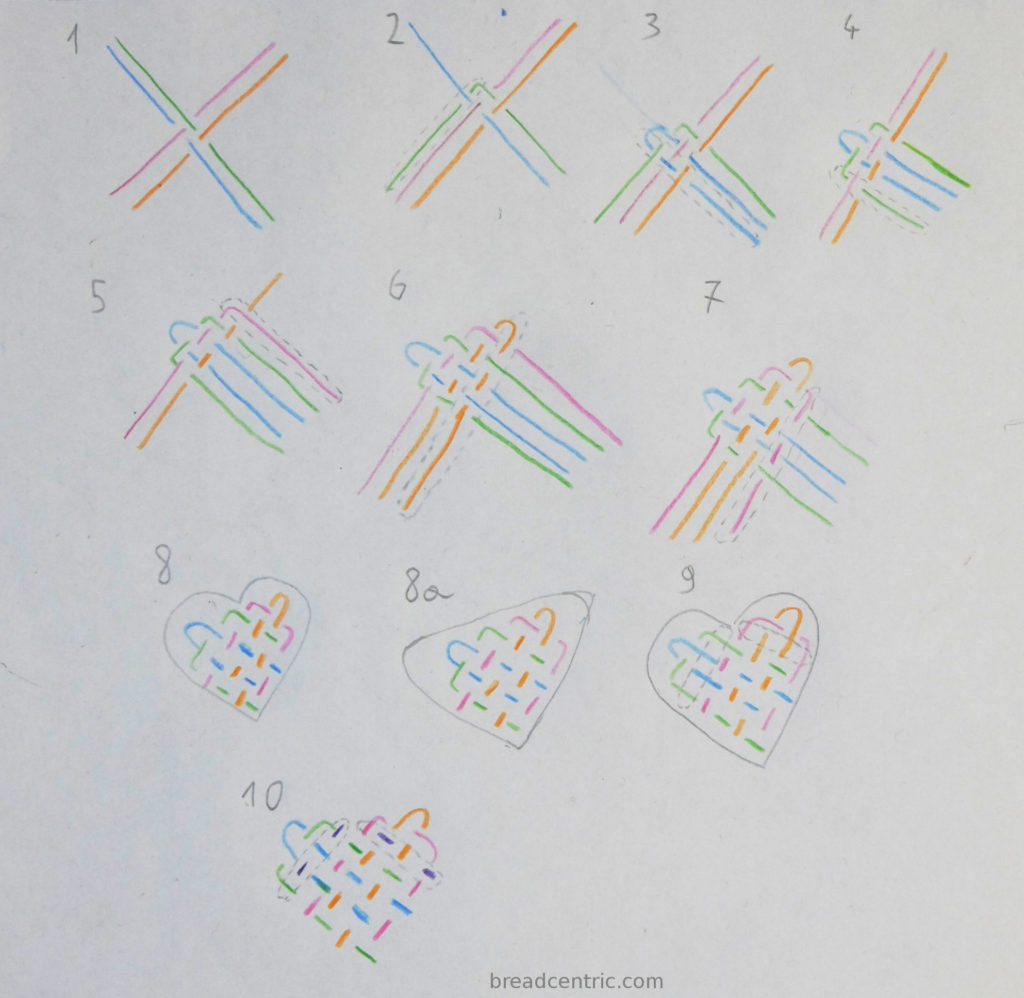
- You’ll need four strings of equal length. Start by making a hash in the middle
- Bend strip 2 (green) outwards by 90 degrees and under the strip 1 (blue)
- Bend strip 1 by 180 degrees and under the strip 2, then braid over the strip 3 (pink) and under the strip 4 (orange)
- Bend strip 2 by 90 degrees again and braid under the strip 3 and over the strip 4
- Bend strip 3 outwards by 90 degrees and over the strip 4
- Bend strip 4 by 180 degrees and over the strip 3, then braid under the strip 2, over the strip 1, under the strip 1 and over the strip 2
- Bend strip 3 by 90 degrees again, and then over strip 2, under strip 1, over strip 1, under strip 2
- Roll the remaining bits of strips under the heart. There shouldn’t be much of it. I’ve cut the excess bit off.
You’ll notice that the heart looks a bit like a triangle. That’s why I suggest two alterations: - Extend the arms at the “wings”, but that may leave you with four strips that don’t necessarily stick together
- Prepare two more short strips and braid them on the wings. They should not be joined and this should give the right shape
Some music to braid to (a friend’s band):
[youtube https://www.youtube.com/watch?v=CV-nbr9O3l8 ]
Przy szkole córki działa stowarzyszenie przyjaciół szkoły (głównie rodziców), które regularnie zbiera pieniądze, aby zapewnić dzieciom kilka dodatkowych atrakcji, takich jak wyjście do teatru. Jednym z wydarzeń jest kiermasz ciast na Walentyki.
Cóż, nie jestem dobry w ciastach, ale powiem Wam sekret: nikt nie sprawdzał, co przynosisz, chleb też przeszedł! Rok temu zrobiłem taki w kształcie serca:
W tym roku postanowiłem zrobić mniejsze bochenki (o nich później) i coś dodatkowego. Już kiedyś robiłem chałki i uwielbiam wyzwanie, jakie się z nimi wiąże. Pierwsze wyszły bardzo nierówne i chciałem się poprawić. Poza tym wpadłem na pomysł, jak zapleść serce. Nie wyszło idealnie, ale na początek jest ok.
Przepis pochodzi z “Chleba” J. Hamelmana (źródła), tak samo schematy zaplatania. Znam pewną książkę o zaplataniu “The art of braiding bread” Roberto van Krammera. Nie mam jej, ale autor wywarł na mnie spore wrażenie. Jeśli będę zaplatał więcej, pewnie ją kupię.
Zaplecenie serca opisuję poniżej.
Planowanie
Będzie potrzebna spora powierzchnia na zaplatanie. Ciasto jest gotowe po kilku minutach, wyrasta przez około 2,5 godziny, następnie dzielisz je na porcje, robisz pasma, zaplatasz. Ciasto jest dość sztywne i sprężynujące, więc zrobienie właściwych pasm jest dość czasochłonne. W związku z tym każde pasmo trochę rozciągam i daję mu odpocząć, przechodząc do kolejnego. Zapleciony chleb wyrasta 2-2,5 godziny i piecze się przez około 30 minut.
Składniki
- 607 g mąki pszennej chlebowej
- 300 g mąki wysokoglutenowej (ja używam pszennej chlebowej i na każde 100 g dodaję około 6 g glutenu w proszku)
- 74 g cukru
- 68 g żółtek (u nas były to żółtka z trzech dużych jajek)
- 128 g jajek (dwa duże jajka u nas)
- 68 g oleju roślinnego
- 289 g wody
- 17 g soli
- 9 g drożdży w proszku, lub około 27 g świeżych drożdży
- Trochę maku i jajko na posmarowanie przed pieczeniem
Przygotowanie
- Mieszaj wszystkie składniki do połączenia na niższej prędkości przez około dwie minuty, następnie wyrabiaj na wyższej prędkości przez koło 6 minut. To jest sztywne ciasto i potrzeba wiele wyrabiania, więc mocno polecam użycie miksera planetarnego (albo rzucenie wyzwania siłaczowi, jeśli masz takiego w domu). A, jeszcze jedno – ciasto powinno być dość ciepłe – około 27 stopni. Ja użyłem wody o temperaturze około 40 stopni, do składników w temperaturze pokojowej, około 20 stopni. Jeśli końcowe ciasto będzie zimniejsze niż 27 stopni, będzie wyrastało dłużej
- Pozostaw do pierwszego wyrośnięcia przez około 2,5 godziny.
Przepis nie zawierał informacji o składaniu lub odgazowaniu, ale ja odgazowałem po godzinie, żeby nie mieć wielkich bąbli w cieście - Podziel ciasto na porcje. Ja moje dzieliłem głównie na kawałki po 85 g, tylko kilka podzieliłem na 145 g każdy – było dość trudno nadać im właściwy kształt
- Musisz rozwałkować dłońmi ciasto na długie pasma. Użyj wewnętrznej strony dłoni, zaczynając od środka i rolując z rozciąganiem do zewnątrz. Odłóż na bok, zacznij kolejny kawałek, a potem wróć do tego wcześniejszego i dokończ. Jeśli wyczujesz bąbel gazu, polecam go przedziurawić i wydobyć gaz, żeby uniknąć nierównego pasma i deformacji plecionki. Pasma 85 g rolowałem do około 35 cm długości.
- Kiedy zaplatasz, dbaj o powtarzalność wzoru i nie zaciskaj pasm zbyt ciasno – potrzebują trochę miejsca do wyrośnięcia
- Pozostaw zaplecione bochenki do wyrośnięcia na 2-2,5 godziny. Ja zostawiłem na tackach do pieczenia. Nie układaj ich zbyt blisko siebie, bo rozrosną się w czasie pieczenia. Niektóre nawet się podwoiły
- Nastaw piekarnik na 190 stopni bez wiatraka (góra-dół), lub około 170 stopni z wiatrakiem. Nie polecam używania wiatraka
- Kiedy ciasto wyrośnie, posmaruj je wykiełtanym jajkiem za pomocą pędzelka, po czym posyp makiem i wsadź do piekarnika. Doglądaj wypieków i zamieniaj kolejnością góra-dół. Zazwyczaj wkładam tacki do dolnej części piekarnika, żeby wierzchnia skórka nie zapiekła się zbyt szybko
- W przepisie czas pieczenia to 30 minut, ale u mnie po 30 minutach były już trochę zbyt ciemne, więc obserwowałem je i wyjmowałem gdy się zbrązowiły, ale nie były zbyt ciemne
Zaplatanie serca

Bardziej niż serce wyszedł trójkąt, ale to było pierwsze podejście. Mam pomysł na poprawienie tego, opisuję poniżej.

- Potrzebne są cztery pasma jednakowej długości. Zacznij od zrobienia kratki w środku
- Zegnij pasmo 2 (zielone) o 90 stopni do zewnątrz i poprowadź pod pasmem 1 (niebieskim)
- Zegnij pasmo 1 o 180 stopni i poprowadź pod pasmem 2, nad pasmem 3 (różowe) i pod pasmem 4 (pomarańczowe)
- Zegnij pasmo 2 ponownie o 90 stopni i poprowadź pod pasmem 3 i nad pasmem 4
- Zegnij pasmo 3 o 90 stopni do zewnątrz i poprowadź nad pasmem 4
- Zegnij pasmo 4 o 180 stopni i poprowadź nad pasmem 3, pod pasmem 2, nad pasmem 1, pod pasmem 1 i nad pasmem 2
- Zegnij pasmo 3 ponownie o 90 stopni i poprowadź nad pasmem 2, pod pasmem 1, nad pasmem 1 i pod pasmem 2
- Zawiń pozostałe kawałki pasem pod serce. Nie powinno być ich zbyt wiele, ja nadmiar odciąłem.
Zauważ, że serce wygląda trochę jak trójkąt. Dlatego proponuję dwie opcje:: - Rozszerz “ramiona” serca, ale to może spowodować, że będą pasma, które niekoniecznie się ze sobą połączą
- Przygotuj dwa krótkie pasma i zapleć je na “ramionach”. Nie powinny być ze sobą połączone, co powinno dać wcięcie jak najleży
Trochę muzyki do zaplatania (zespół kolegi):
[youtube https://www.youtube.com/watch?v=CV-nbr9O3l8 ]
Ale super przepisy. Lecę do sklepu i już wiem, co będę pichcić wieczorem 🙂